Translate

Showing posts with label Yum Cha Sweets. Show all posts

Friday, May 17, 2019

Pavlova


Has it been more than two years already since I've lain dormant?  Really?  Two whole years?!! Oh my... then it's about time that I make a come-back, don't you think ?😊

It's been a hectic time for me in the last couple of years juggling an ever-challenging and demanding career while balancing time with the family.  Finally I decided to pull down the curtain and take a breather from the rat-race life to fully concentrate on the family.

And now that I'm off the 'work-force' and spending time to be a full-time home minster (for now) for the past one year, I'll try to find some time to start blogging again.  May take a while to get back in the groove again.

I have to admit that I'm quite lazy to start writing again and editing and uploading the photos too.. 😁
In fact, when I opened my blog I stared at it for a while trying to figure out how do I navigate and start a new post not to mention that I am at a loss for words too... lol.  Also, wanted to change the look and feel of my blog to start anew! See... I'm a bit rusty.

Every now and then I do miss the work-life especially my friends and 'social lunches' and feeding them with my goodies.  Not to mention the month end pay check too... sigh!  Well, you have to sacrifice some and gain some right!  I do however, get together with my ex-colleagues who became my close and good friends for lunch or weekend tea whenever their busy schedule permit.  I, on the other hand, is keeping 'me'-self pretty busy too playing the dotting mom and cooking and ferrying my kids from school and tuition.

So, I've not been the 'lady-of-leisure' as some of my friends put it.  Being a home minister is not a glamorous job 👩‍🍳👩‍🌾.  You are constantly planning, executing, implementing, budgeting and sweating 😅 (literally due to no air conditioning unlike at the office).  Well, every job has it's perks and challenges even a non-wage job 🤣 but the returns is high.   Life is even busier than when I was a career woman but this is a 'nice and satisfying' kinda busy feeling if you know what I mean. 😉
I am actually enjoying my new role especially when I was not able to do this when my children were younger.  Better late than never.

Anyways,  that's my brief 'what's been going-on with my life of late' for you.. 😜😜😜

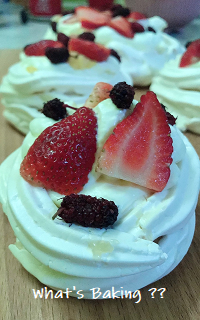
So to start off after missing in action, here's a dessert which I recently baked.. Pavlova.

This is my second try at baking this pav.  The first was a week ago and by popular demand from hubby, here's the second bake.  I always thought that it's difficult to bake this dessert but actually it's quite simple.  The important part was to whip the egg whites well but not to over beat them.  Bake them at very slow oven for more than an hour and you'll get a crispy white shell with a soft marshmallow-like center.  Fill it with whipped cream after it's cooled and throw in some berries or any fruits that you like.  Goes well with a little lemon curd if you have them.
Enjoy...!


You will need ...
6 egg whites at room temperature
1 cup sugar
2 tsp corn starch
1/2 tbsp lemon juice
1/2 tbsp vanilla extract

Frosting...
1.5 cup cold heavy whipping cream } whipped till soft peaks
2 tbsp sugar }

Topping...
mixed berries or kiwis or peaches etc

Here's how...
1. Pre-heat oven to very low at 115 degree Celsius.  Line a baking tray with a baking parchment paper and draw one 8inch circle or six 4inch circles for a mini pavs.  Turn the paper over with the drawings facing down.

2. Using a stand mixer, beat the 6 egg whites on high speed for 1 min until soft peak forms.  With mixer running, gradually add 1 cup of sugar and beat for 10 mins on high until stiff peaks form.  Mixture will be smooth and glossy.

3. Use a spatula to quickly fold in the lemon juice, vanilla extract and the corn starch.  Mix well.

4. Pipe the meringue onto the parchment paper following the circles to form a nest.  Level the bottom with spatula and bake for 1 hour and 15 mins until the outer meringue is crispy.  Turn off the oven and leave it in the oven with door close for another 30 mins to let it dry.  The outside outside will be dry and crisp to the tap and pale cream color (almost white) and the inside will be marshmallow soft.

5. Transfer the pav with the parchment paper on the counter or cookie rack to cool at room temperature.  Once cool, top it with whipped cream and fruit.

The pavlova shell can be stored in an airtight container and leave at room temperature for 3-5 days.

There! I made it.  My 'come-back' post after two long years.  (Good job! Giving myself a pat on my shoulder for completing this and posting it 👍)
Let's not wait for another two years shall we.. 😉😎

Until then.. see ya again.. soon.. I hope ... errr... bye!


Saturday, June 25, 2016

Marble Pound Cake

If you are looking for a moist, soft and chocolaty marble cake, look no further. This is THE one! Thanks to Anna Olson, I have found the perfect marble cake.

This cake is not too big or too rich. It is certainly moist and soft and the size is just right.


3/4 cup (185 ml) unsalted butter
1 cup sugar
4 eggs
2 tsp vanilla extract
2 cups all purpose flour
1 1/4 tsp baking powder
1/4 tsp salt
2/3 cup (160 ml) sour cream
4 oz (120g) bittersweet choc, chopped and melted

1. Pre heat oven to 160 degree celsius. Grease 9 x 5 inch loaf pan and dust with flour, tapping out any excess.
2. Using electric mixer beat butter and sugar untill light and fluffy about 2 mins. Add eggs one at a time, beating wella after each addition. Stir in vanilla.
3. In separate bowl, sift and whisk flour, baking powder and salt. Add this to the butter mixture, alternating with sour cream and blending well after each addition, starting and finishing with flour. Scrape half if this mixture into another bowl.
4. Melt the chocolate and add warm chocolate to one bowl of the batter and stir until blended. Dollop vanilla batter and chocolate batter in alternate spoonfuls into pan.  Use a paring knife to swirl the batter.
5. Bake the cake for 60 to 70 mins until a tester inserted in the center of the cake comes out clean. Cool cake for 30 mins in the pan, then turn cake out to cool completely.

Tuesday, September 1, 2015

Apple Roses Pie

Couple of months ago a friend of mine shared a video on how to make Apple Roses dessert video on Facebook and after watching it I'm hooked.  The video is from a food blogger called Cooking With Manuela and she has many wonderful recipes and videos. 

Here's my Apple Roses Pie.  It looks complicated but it's not.  So very easy and yet so pretty and delicious.  Don't worry, the link to this blogger and her video on how to make this is included below.
Have a go at this and your family will be awed by the beauty of this pie. :)


www.cookingwithmanuela.blogspot.com

http://www.cookingwithmanuela.blogspot.com/p/videos.html
 

Friday, January 24, 2014

Nyonya Pineapple Tarts

G O N G   X I   F A   C A I ,    E V E R Y O N E!

It's time to wish everyone a very happy and prosperous Chinese New Year! May the year of the Horse brings you an abundance of good luck, good fortune, good health and much joy.

The first cookie to be eaten for this auspicious celebration should be this authentic Nyonya Pineapple Tarts.  Why?  Because pineapple is called 'Ong Lai' in Hokkien dialect which means luck has come.  In Chinese community, everything and anything that is considered 'good' will be largely consumed or celebrated on such auspicious occasion.

Here, I present to you the authentic Nyonya Pineapple Tarts.  My family and I love to eat this tart.  Some would call this a cookie but actually it's not.  The pineapple jam should not be too sweet.  If too much sugar is used in cooking the jam, you will not get the taste of sweet-sourness of the pineapple.  That slight sourness of the pineapple that compliments the pastry.  The store bought jam is usually loaded with sugar and they thicken it with cornflour so that less pineapple is used.  Pineapples are not that cheap.  So for commercially processed jam, all that matters is the profit and not the taste.  That's why I don't buy commercialized pineapple tarts.  I'd prefer to make them although it is a very tedious process at making them.  So, I only do this once in every few years.. :) - provided I'm in the mood to be 'hardworking'! lol

The secret to making this tart is in the kneading of the pastry.  I don't exactly have the right measurement of the margarine used.  My late mom thought my sisters and I when we were younger on how to 'feel' the dough when making this tart.  The dough should not be too dry or too wet.  That's why most people who do not have the 'right' method or tricks in kneading the dough but rather follow the recipe book, may not get the right texture or taste for this tart.  So, I guess my siblings and I are rather lucky to have learned the tricks first hand.

There's really nothing to it if you know how.. wink! wink!

So, here's the recipe for the ingredients and I try to give you the exact measurement as I can...


Pineapple Jam:
3-4 large pineapple (try to get the ripe ones)
Granulated Sugar to taste (approx. 500g, depending on the natural sweetness of the pineapples)
(I know that some families use spices like the star anise or cinnamon sticks when prepare this jam.  My family prefer not to use the spices.  We like the natural taste of the pineapple that is not being overwhelmed by the spices)

1. Cut the pineapple and cut out the 'eyes'.  Chopped into bite sizes.
2. Blend the pineapple and strain.  Run it over clean water and leave to strain for an hour or so.
3. Cook the pineapple in a wok, keep stirring for about 45 mins, then add sugar.  Cook until pineapple is almost dry and the color changes to darker golden yellow.  Leave to cool before use.  Can be frozen for a couple of months.

Pastry:
600gm wheat flour
250gm margarine (has to be margarine.  Do not use butter) - add more as needed
1/2 cup hot salted water (hot water mix with 1/2 tsp salt)
3 egg yolks
1 egg white

1. Rub flour with margarine.  Texture should not be too sandy or too 'wet'.  When you pinch the dough together, it should be able to hold the shape.
2. Add the egg yolks and the egg white.  Knead well and add the salted water.
3. Roll out the dough and use the tart mould to cut out the tart discs.  Fill the center with pineapple jam.
4. Use the same dough to make the center pattern.  However, the original version, for the pattern dough, do the same for the pastry dough but add more egg whites to it so that it'll be stiffer and stretchable.
5. Brush egg wash on the pastry and bake at 160d C until the pastry is golden brown.


Saturday, September 28, 2013

Onion Fritters and Cookies & Banana & Oreo Ice Cream Dessert

A colleague of mine had her retirement party last week.  The retirement age in Malaysia is 60.  I envy her for having reached the age where she will have all the time in the world to do whatever she wants.  On top of that, a final big fat check from the Company to cover her retirement years.  How I wish I'm her, er..minus the age, to enjoy the time and $$!!  Well, being envious is all I can do right now as I have a long way to go before I reach there.  Until then, I've to wake up early in the morning, see the kids to school, go to work, come home, go to sleep and the day repeats until the weekend.

When weekend comes, I'm like 'yeay, its the weekend! I can spend time with my family and feed them well!'.  I always look forward to spending time with my family even though the kids will fight and sometimes they irritate the hell out of you, but hey, I'm not complaining.  It'd rather have this than go to work.

Well, being a working mom, my kids always look forward to weekends where they get to eat food prepared by their mom.  I have 3 hungry tummies to feed.  Here, I'm sharing with you a great and easy tea-time snack that you can prepare in such a short time and they are delicious.


Onion Fritters
serves 4-5

1 1/5 cups self raising flour
2 medium sized big onions, chopped into squares
2 fresh red chillies, seeded and chopped
3 sprigs spring onion, chopped
salt to taste
3/4 cup water
100g shrimp, shelled (optional)
vegetable oil for deep frying

1. Mix all the ingredients together and add 1/2 cup water first.  Adjust the consistency of the batter.  If it's too think add more water.  Batter should not be runny.  Should be thicker than pancake batter.
2. Heat oil in wok and drop spoonful of batter into the hot oil.  Fry until they are golden brown.
Serve with chili sauce.

For dessert, here's Cookies & Banana & Oreo Ice Cream.

Saturday, April 20, 2013

Homemade Chicken Pie

One of the long lists of things to make, is the homemade chicken pie.  Mmm..mmm.. so yummey!

But I have to admit that I cheated.  Cheated on the pastry. Hah! One thing that I am lazy with is making pastries and breads.  If you ever find me making those, then I'm in one of those rare moods to want to make  it.  So as I'm very lazy as usual, I used the frozen pastry puffs.  It worked, didn't it?  And most importantly, it tasted good and my family enjoyed it.

The filling is my own recipe.  You can have it a bit spicy if you like by adding curry powder or if you like it creamy, use cream and milk etc.  I like mine to be neither.  More like stew type.

 For the filling, you will need:
2 pieces of chicken breasts
1 big onion, diced
3 stalks celery, diced
1 can button mushrooms, sliced
1 small floret cauliflower, cut into small chunks
1 small can of green peas, drained
2 tbsp butter
dash of olive oil
1/4 cup water
salt and pepper
worchestershire sauce
white wine vinegar
dash of sugar

Store bought frozen pastry puff, thawed at room temperature
1 egg wash for pastry

Pre heat oven to 180dC.
1. Heat a saucepan with some olive oil and butter.  Add onion and fry till soft.  Add chicken and fry till chicken to half cooked.
2. Add in cauliflower and celery, add water and cover for 1 min.  Add in mushroom and green pea.
3. Add in salt, pepper, worchestershire sauce and white wine vinegar.  Cover and simmer for 2 mins.  Add in sugar to taste.
4. Once chicken is cooked and vegetables are soft, take off heat and let cool.
5. Line disposable pie foil with puff pastry if you like.  (You can omit this and just place the pastry on top to cover.)
6. Add in the filling and cover with puff pastry.  Brush with egg wash and place on baking tray and bake till pastry is puffed and golden.

Serve immediately.


Saturday, April 6, 2013

White Chocolate Raspberry Lime Cheesecake

Who don't love cheesecake?  Most people do but a handful don't. Those who have dairy intolerance will not stand for it. To them it's disgusting. I know that some are affected by 'all-in-your-mind' syndrome when it comes to cheese.  I mean, if you make it into chocolate cheese or any other stronger flavor that covers the cheesy taste, it's alright for them.  They practically enjoy eating them but when it comes to plain cheesecake, they will go 'urgh! how disgusting'.. yeah yeah yeah.. so it's all-in-your-mind kind of thing, doesn't it?  Amazing at how the mind can play with your emotions and actions.

Anyway, I'll be happier if more people don't like cheesecake because I will get a bigger share in it..heehhehee.

This particular recipe is from my newly acquired Anna Olson's Back To Baking cookbook.  I love all her recipes and enjoyed watching her show in AFC.  The only thing that I change from this recipe is, substituting raspberries with blueberries since I have blueberries in my freezer and I used lemon instead of lime.  For the crust, I used my almost expired Famous Amos cookie biscuits which my neighbor gave us a couple of weeks ago.

This is very creamy, melt-in-the-mouth cheesecake.  If you love cheesecake the way I do, I highly encourage you to try this recipe.


THE recipe!

Crust:
2 1/2 cups cookie crumbs from other buttery sugar cookies (I used Famous Amos biscuit cookies)
1/4 cup (60ml) unsalted butter, melted

Filling:
2 pkg (250g each) cream cheese at room temperature
2 tbsp all purpose flour
1/4 cup sugar
1/2 cup sour cream
3 tbsp lime juice (I used lemon juice)
2 tsp finely grated lime zest (I used lemon zest)
1 tsp vanilla extract
2 eggs at room temperature
1 egg yolk
125g white chocolate, chopped
1 cup fresh raspberries (I used blueberries)

1. Pre-heat oven to175dC and great a 9 in springform pan.
2. Stir in the cookie crumbs with melted butter and press them into the bottom of the prepared pan.  Bake for 10mins and cool while preparing the filling.
3. Reduce the oven temp to 150dC. Beat the cream cheese and flour until light and fully. Slowly pour in the sugar while beating.  Beat in the sour cream, lime (lemon) juice, zest, vanilla until blended.  One at a time, add in the eggs and yolk, beating well. By hand, fold in the white chocolate and raspberries (blueberries).
Pour on to the crust.
4. Place the pan on a baking tray and bake for about 40 mins (I baked for 50 - 60 mins) until the outside edges of the cake are set but centre still a little jiggly.  Cool cheesecake at room temperature and then chillin the fridge.


Saturday, October 6, 2012

Doughnuts

Is it October already?  How the months just breezed by..we have less than 90 days to 2013!  This is really scary.  So many things to do with so little time but I'm glad I finally managed to do my first doughnut.

Doughnut pans in Malaysia is very costly and not sold everywhere.  You have to go to a specialty bakery store to find one and even that, it only has 6 holes in it.  I got my medium sized 12-hole pan from Australia.  A good friend of mine helped me to get one from K-Mart and it's cheap. I'm already loving it.

Since I've the doughnut pan, I've got to get the recipe.  So this is from my newly acquired doughnut recipe book by Lara Ferroni entitled simply 'Doughnuts'. The review from Amazon is good and they are absolutely correct!

Baked Doughnut (makes 6 to 12 doughnuts)

3/4 cup plus 1 tbsp all purpose flour } I substitute these two flours with bread flour
1/4 cup whole wheat pastry flour      }
1 tsp baking powder
1/3 cup superfine sugar
1/2 tsp freshly grated nutmeg } I used ground cinnamon instead
1/2 tsp salt
2 tbsp unsalted butter or vegetable shortening
1/4 cup whole milk, scalded
1/4 cup plain yogurt
1 tsp vanilla etract
1 egg, beaten

1. Preheat oven to 180dC, lightly grease a doughnut pan.
2. Sift the flour and baking powder together in a mixing bowl.  Whisk in sugar, nutmeg and salt.  Add the butter and use your fingers to rub it into the dry ingredients as you would in making a pastry crust, until evenly distributed. Add the milk, yogurt, vanilla and egg, still until combined.  Do not overmix or your doughnuts may be rubbery.
3. Use a piping bag or a spoon to fill each doughnut cup about 3/4 full, making sure the center post is clear. Bake until light golden brown and spring back when touched, 6-10mins.  Let cool slightly before removing from pan. Glaze as desired.

Glaze:
I used chocolate ganache and white chocolate ganache.  Sprinkles: chopped toasted almonds bits, choc chip cookie crumbs, chocolate rice, heart sweet sprinkles and tiny choc pearls.

 My precious doughnut pan.


A great recipe..thanks, Lara!

Saturday, September 22, 2012

Onde Onde (Buah Melaka)


Onde Onde, pronounced as 'onn-day onn-day' or also known as Buah Melaka by the Peranakans, originates from the state of Melaka.  These sweet balls of treat is one of the many Peranakan desserts and very popular with the locals.  We love these sweet morsels. It has a soft dough coated with lightly salted grated coconut and filled with natural flavors of Gula Melaka (the Pernakans call them Gula Tuak) as the filling.  Gula Melaka, otherwise known as Palm Sugar is made by first extracting the sap from the flower bud of a coconut tree.  Several slits are cut into the bud and a pot is tied underneath the bud to collect the sap.  Then the sap is boiled until it thickens after which, in the traditional way, it is poured into bamboo tubes between 3-5 inches in length, and left to solidify to form cylindrical cake blocks. Alternatively it can be poured into glass jars or plastic bags.  Here's how they look like.

The way to eat the onde onde is by popping the sweet ball into your mouth.  When you bite into it, the Gula Melaka filling will just burst and ooze into your mouth.  It's an explosion of flavors.  The saltiness of the coconut, the almost maple-like sweetness of the Gula Melaka and the chewiness of the dough.  So little ingredients and yet so rich in flavor.  Here's the recipe and step-by-step on how to make them.  Please enjoy!

Yields: 70-80 balls
500g glutinous rice flour (you can also use boiled mash sweet potatoes - 3 parts of sweet potatoes to 1 part of glutinous rice flour)
1  1/4 cup pandan juice (blend some pandan leaves or screwpine leaves with a little water, squeeze the  juice out. Add more juice as needed.)
1 1/2 tubes of Gula Melaka, chopped into small pieces
2 coconuts - grated coarsely without skin and mixed with a pinch of salt.


1. Mix pandan juice with the glutionous rice flour and mix to a dough. Cover dough with damp towel to avoid drying.
2. Bring a pot of boiling water, lower the heat to simmer gently, pinch out a ball of dough about the size of a lime, flatten it into a disc and drop it into the simmering water.  When the disc is cooked and rises to the surface, lift if out with a slotted spoon, shake off excess water and knead the cooked dough evenly back into the main ball of dough.


Chopped Gula Melaka                    Grated coconut mixed with a pinch of salt


3. Pinch off small balls of dough the size of calamansi limes and roll into smooth balls. Shape it into a flat disc and fill the center with chopped Gula Melaka. Pinch together the dough together to enclose and roll them gently to smoothen the ball, and drop them into the simmering water.
4. When the dough balls float to the top, carefully remove them with a slotted spoon and allow any excess water to drip off. Drop the balls into the grated coconut and roll them to coat evenly.  Transfer to serving plate.  

You can also store them in an air tight container and refrigerate them prior to serving if desired.


This is a definite thumbs up!  

Pavlova Has it been more than two years already since I've lain dormant?  Really?  Two whole years?!! Oh my... then it's about t...