Translate

Saturday, June 23, 2012

Blueberry Pancake

Finally, finally, I've got my pancakes thick and plump like the way it should be! All this, thanks to my daughter since she wanted some pancakes for breakfast, she took out her recipe book 'The Disney Magic Kitchen Cookbook' which she got as a present from my sis for Christmas last year and asked me if I could make some.  Since I like pancakes too, so okay, it's a deal!  Got some blueberry in the freezer plus a container of ice cream, the plan went well.  So, my quest looking for a good recipe for thick fluffy pancakes is over! Imagine, after so long searching through cookbooks, I never thought I would find the perfect recipe from a children cookbook! lol..lesson learnt, never judge a cookbook by it's cover!


I know for some of you, it's a breeze in getting your pancakes as thick or as thin as you want.  I, for one, like it thick but never got it as plump as this until now..so, I'm happy at last. 


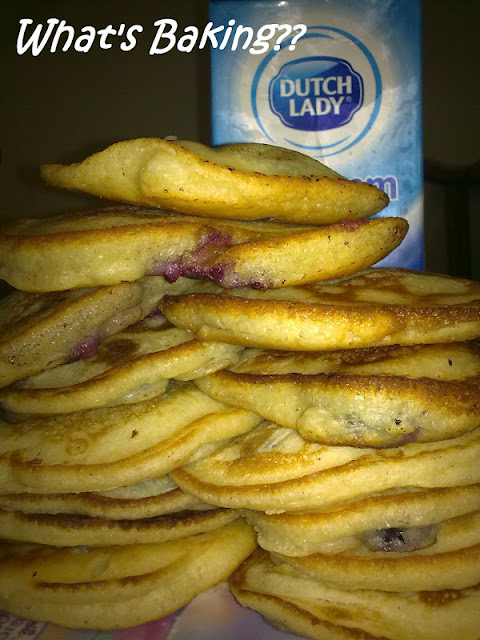
 See how thick and plump they are...!


 And the texture is so light!  Drizzle some honey on it, mm..m..mm!

 Wanna have with some whipped cream? Why not?

How about with some ice-cream?  Ooo...goody...!

Recipe:
1 cup whole wheat or all-purpose flour
2 tsp sugar
2 tsp baking powder
1/4 tsp salt
1 egg
1 cup fat-free milk (I used full cream)
2 tbsp canola oil
1 cup fresh or frozen blueberries
1/4 cup chopped walnuts (optional)
2/3 cup frozen light whipped dessert topping, thawed
ice cream

1. Put flour, sugar, baking powder and salt in a medium bowl. Stir with a wooden spoon to mix, Save until step 3.
2. Beat the eggs in a medium bowl until the well mixed.  Add milk and oil to the egg, beat with the fork until ingredients are well mixed.
3. Add the egg mixture to the flour mixture. Stir with the wooden spoon until the mixture is well and almost smooth. Gently stir in 1/2 cup of the blueberries and the walnuts.
4. Lightly coat the griddle or large skillet with some oil and on medium heat, pour about 1/4 cup of the batter onto the hot griddle or skillet. Cook until the pancakes have bubbly surface and the edges are dry.
6. Turn the pancakes over with the spatula and cook until bottom are golden brown. Remove from griddle or skillet and cover with foil to keep warm. Repeat until batter is finish.
7. Serve with honey, or whipped cream or ice cream or jam. Sprinkle the remaining 1/2 cup blueberries on pancakes.

Makes 8 servings.


Wednesday, June 13, 2012

Mango Chocolate Brownie and Strawberry Chocolate Brownie


Have you ever heard of Mango Chocolate or Strawberry Chocolate Brownies?  I, for one, never heard of it.  So, this idea of mine came about as I was kinda itching to make brownies.  You can call it 'spur-of-the-moment-baking itch'!

I wanted to make a different type of brownie with new flavors other than the usual dark chocolate ones.  So out comes my recipe books on brownies.  After browsing through, I decided to try out something new out of my own.  Then I remembered that I have these blocks of flavored chocolates sitting in my refrigerator and before they are totally forgotten, I'd better try at making brownies out of them.  So here are my Mango and Strawberry Chocolate Brownies which you can't get in any bakery except making them your own or stop by my house..lol.  The result?  Amazingly good!  Hubby and kids enjoy them very much and I think my in-laws, my colleagues (yes, friends, you'll get some too tomorrow!) and my neighbor will undoubtedly enjoy them too!
Mango Chocolate Brownie


Strawberry Chocolate Brownie
Here's how it's made.

250g Mango or Strawberry flavored chocolate blocks (you can use any other flavored chocolate ie orange, lemon that you may find near your baking ingredient store)
100g butter
3/4 cup caster sugar (you don't need much as the flavored chocolates are usually quite sweet)
4 eggs
1 tsp vanilla extract
1 cup all-purpose flour
1/2 tsp baking powder

1. Pre-heat oven to 180dC, line baking pan with parchment paper.
2. On a double boiler, melt the flavored chocolate with the butter.  Take off heat and stir in the sugar.  Whisk  to mix well.
3. Add eggs one at a time and whisk till combine and add vanilla.
4. Add in the flour in 2 batches and mix well.
5. Pour into prepared pan and bake for 40-45 mins or until done.

The texture of this brownie is gooey in the inside but crispy at the top.  Love it.  I shall add this recipe to my special book where I record recipes that I created for a 'hand-me-down' to my kids (hopefully they'll take after me at baking and cooking).. :)


Like? Bake it! Kids and adults will love these.

Thursday, June 7, 2012

Chicken Sausage Pizza & Pesto Pizza


You know, I take my hats off for all full-time home-maker in the whole wide world.  Especially when you have school going children and you've got to prepare at least 3 main meals a day (not forgetting in between snacks), it's a wonder all mothers didn't go bald! I mean, going bald not because of the $ involve in feeding the family, rather the menu for each day! 

I'm a working mother and even on weekends, I'm at a lost on what to cook.  Don't even bother to ask the family on what they want as they would always say 'anything la'.  In the end, I would tell them, 'ok, since anything goes, I cook whatever and no complaints'. 

Since I've been staying home a lot for the past month due to some family 'crisis', I've been cooking a lot lately and I do mean a lot!. So, one of the days to entertain my children taste buds, I decided to make them pizza..yup! Their favorite.  

I saw on the Food Channel the other day where this chef gave a useful tip when making pizza.  He said that to make a good tasty pizza is not to have more than 2 or 3 ingredients as your topping not counting the cheese.  Otherwise, you will only taste the topping and not the pizza as a whole.  So, with that tips in mind, I made the Chicken Sausage Pizza for my children and Pesto Pizza for my hubby and I.  My children doesn't like pesto, so with these two types of toppings, everyone is happy!

In my many, many, many recipe books that I have, this is the simplest, quickest and very nice pizza dough.

Here's how it's made:
(this recipe makes 1 large pizza. I triple it to satisfy my family's cravings for pizza)

250g 'oo' or strong white bread flour, plus extra for sprinkling
1/2 tsp table salt
7g sachet easy-blend dried yeast
2 tbsp olive oil, plus extra to coat
125ml tepid water

1. Put the flour, salt and yeast in a large bowl and mix. Make a well in the centre, add the oil and water and gradually work in the flour to make a soft dough. Sprinkle over a little flour if the mixture feels too sticky but make sure it's not too dry either; the dough should be pliable and smooth.
2. Transfer the dough to a lightly floured surface, knead for 10 mins, sprinkling with a little more flour when needed, until the dough is smooth and stretchy.
3. Rub some oil over the surface of the dough and return the dough to the bowl. Cover with a clean tea towel and leave for about 1 hour until the dough has doubled in size.
4. Remove the dough to a lightly floured surface and knead for 2 mins until the excess air is knocked out. Rolled out the dough according to the recipe you are following.

Pizza sauce: I'm a bit lazy this time to make it from scratch, so I used spaghetti sauce in a can (try to use the original or mushroom ones)

Toppings:
1. Chicken Sausage Pizza - Spread pizza sauce, top with chicken sausages cut into slices, slices of button mushrooms, cheddar cheese and mozzarella cheese.  (Remember the tips: keep to the minimal).
2. Pesto topping - for the pesto, blend together sweet basil leaf, pine nuts (optional), salt, pepper and olive oil, into a smooth paste.  Spread pesto on pizza dough and arrange slices of fresh tomatoes. Sprinkle cheddar and mozzarella cheese.

Bake pizza in a pre-heated oven at 190dC for about 15 mins-20 mins or until cheese is melted.
 Pesto Pizza

 Chicken Sausage Pizza


The Chef was right! It was delicious with only a few ingredients as the topping.  Even my neighbour's kid said that it's good...she came over at the right time - dinner time! :)

Sunday, June 3, 2012

Chocolate Yogurt Snack Cake


If you are a frequent visitor to my blog, you might know that I love choc and cakes that use yogurt, buttermilk or sour cream.

This chocolate cake uses yogurt and it's simply irresistible.  Texture is very soft and light.  The original recipe calls for chocolate glaze icing which is very runny and simply wonderful. But since I've some left over cream cheese frosting which can't keep for long, I've decided to use it instead.  Combination of cheese and chocolate?  You guessed it! A perfect marriage of flavors!

Here's the recipe with the original recipe using chocolate icing.

2/3 cup plus 2 tbsp unsweeteened Dutch process cocoa powder, divided
1 3/4 cups all purpose flour
2 tsp baking powder
1 tsp salt
1/2 tsp baking soda
2 cups whole milk plain yogurt, divided
1/3 cup water
1 tsp vanilla
1 1/4 cups granulated sugar
90g butter, softened
2 eggs
2 cups semisweet chocolate chips
1 cup powdered sugar, sifted

1. Pre-heat oven to 180dC. Spray 13 x 9 in baking pan with nonstick cooking spray. Dust with 2 tbsp cocoa, tap out excess.
2. Combine remaining 2/3 cup cocoa, flour, baking powder, salt and baking soda in medium bowl. Whisk 1 cup yogurt, water and vanilla in small bowl until well blended.
3. Beat granulated sugar and butter in large bowl with electric mixer at medium speed about 1 min or until light and fluffy. Add eggs; beat 1 min.  With mixer at low speed, gradually add flour mixture; beat just until combined. Add yogurt mixture, beat 30 seconds. Spread into prepared pan.
4. Bake for 35 - 40 mins or until done, cool on wire rack.
5. Place choc chips and remaining 1 cup yogurt in medium microwaveable bowl. Microwave 30 seconds on high, stire. Microwave 10 seconds, stir. Repeat at 10-second interval until choc is melted and mixture is smooth. (Alternatively, place the bowl in a saucepan of water until choc is melted).  Take off heat and whisk in powdered sugar until well blended. Cover and refrigerate for an hour, stirring occasionally, or until frosting reaches spreading consistency. (Frosting will be soft). Spread over cooled cake.

*for cream cheese frosting, please visit my recent post on Red Velvet Cupcake.


Pavlova Has it been more than two years already since I've lain dormant?  Really?  Two whole years?!! Oh my... then it's about t...